The Mapping Wizard available in the Informatica PowerCenter Designer client provides pre-designed mapping templates to create mappings based on specific requirements like SCD Types 1, 2 & 3.
The example below explains the creation of an SCD Type 2 mapping using the Mapping Wizard. The source table is EMPLOYEES that contains employee information like Employee ID, Name, Role, Department ID, Location, Employment Status and the Date of joining.
The EMPLOYEES table is shown below.
EMPLOYEES
| ||||||
EMP_ID
|
EMP_NAME
|
EMP_ROLE
|
DEPT_ID
|
LOCATION
|
EMPL_STATUS
|
JOIN_DT
|
1321
|
Shaun Mathews
|
Clerk
|
209
|
Atlanta
|
Active
|
13-Apr-08
|
1487
|
Shane Smith
|
Supervisor
|
110
|
Atlanta
|
Active
|
4-Aug-08
|
1678
|
Katie Wells
|
Manager
|
198
|
Atlanta
|
Active
|
20-Aug-08
|
The field EMP_ID is the primary key for the EMPLOYEES table. The fields on which history needs to be maintained are EMP_ROLE, DEPT_ID, LOCATION and EMPL_STATUS.
Import the source definition EMPLOYEES using the Source Analyzer workspace. Go to Sources > Import from Database.

This opens the Import Tables window. Assuming that a system DSN is already created for this connection, specify all the necessary details and click Connect.

Select the EMPLOYEES table to import and click OK to continue.

The EMPLOYEES source definition is created and appears in the workspace. Click Save to save the source definition in the repository.

The source table EMPLOYEES contains only current data and doesn't have any historical data. This mapping would be run daily to capture the historical data in the EMPLOYEES_SCD2 target table. The Effective Date logic would be used for SCD Type 2 mapping.
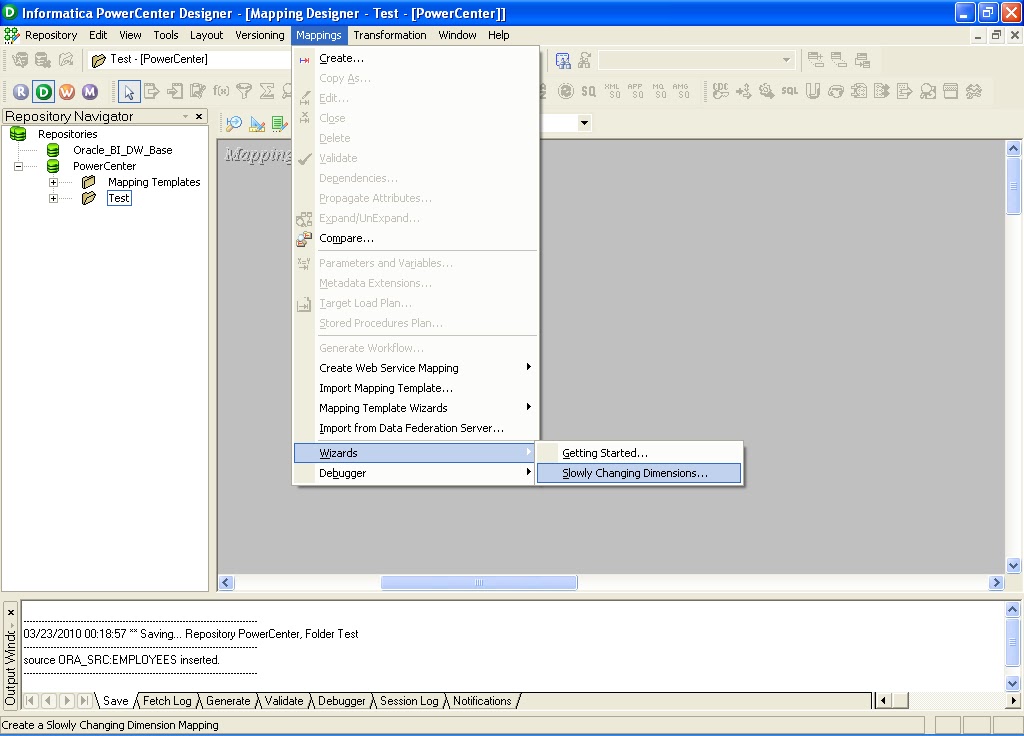
Click on the Mapping Designer tab.
Go to Mappings > Wizards > Slowly Changing Dimensions.
Provide a suitable mapping name as shown and select the Type 2 Dimension radio button. Click Next to continue.

Select the correct Source definition from the Select Source Table drop-down list and type the New Target Table name as EMPLOYEES_SCD2 as shown. Click Next to continue.

This opens the Target Field Selection window as shown.

Add the EMP_ID field as Logical Key Fields as shown as it is the primary key in the EMPLOYEES source table and it will be a part of the Lookup Transformation condition to check if the employee record is present in the EMPLOYEES_SCD2 target table.
Add the remaining fields on which history needs to be maintained as Fields to compare for changes as shown.

Click Next. Select Mark the dimension records with their effective date range as the versioning method to maintain history.

This adds two more fields PM_BEGIN_DATE and PM_END_DATE to the EMPLOYEES_SCD2 target table, which helps identify the effective start date and the end date respectively for each employee's record and if any of the fields on which history needs to be tracked undergo a change in the source table, a new record for that employee will be created with new effective start date and end date will be null. The PM_END_DATE value will be null for all current version of the records in the EMPLOYEES_SCD2 table. The date logic is indeed useful in scenarios wherein the source system doesn't have an effective date or last updated date field and it is binding on the ETL system to provide such a function. However, the definiteness of the effective start and end date being loaded into the history table will also depend on the frequency at which the SCD Type 2 mapping is run.
Click Finish.
The SCD Type 2 mapping is generated.

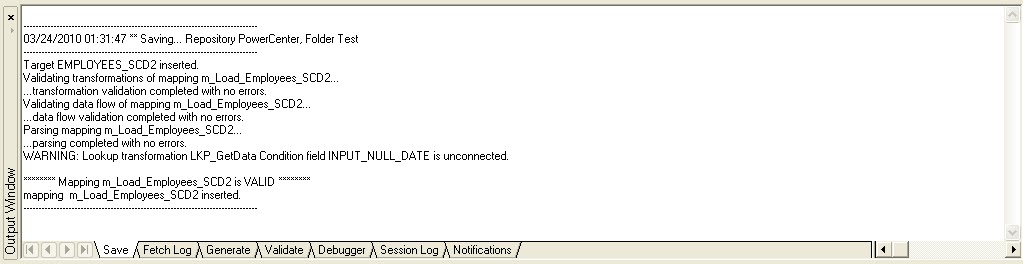
Save the mapping in the repository by pressing Ctrl+S. Check the Output Window below which displays messages stating that the mapping is valid with no parsing errors.
The new target definition EMPLOYEES_SCD2 is created in Informatica Designer, but not in the database.
Drag the target definition EMPLOYEES_SCD2 from the Repository Navigator into the Target Designer workspace.

Go to Targets > Generate/Execute SQL.

This opens the Database Object Generation window. Mention the path and filename for the DDL file to be created. Select the Create table radio button under the Generation options. Select the Create index radio button.

Click Generate and execute.
This opens the Connect to an ODBC Data Source window. Mention the necessary database details where the target table should be created and click Connect.

Check the Output Window to verify if the script has been successfully generated and executed in the database.

Click Close to close the Database Object Generation window.
The iconic view of the mapping is shown below.

A brief description of the transformations used in the mapping is given below.
1. LKP_GetData: This is a lookup on the target table EMPLOYEES_SCD2 and will compare the incoming data from the EMPLOYEES source table based on the key field EMP_ID with that of the target table, EMPLOYEES_SCD2. All the currently active records in the EMPLOYEES_SCD2 table will have a null PM_END_DATE. Hence, only these records should be compared for changes with the incoming data and therefore, an unconnected input port INPUT_NULL_DATE is also matched with the PM_END_DATE field of the lookup table as part of the Condition. The condition used in the lookup transformation LKP_GetData is shown below.

2. EXP_DetectChanges: This expression transformation will generate two flags - ChangedFlag and NewFlag. The ChangedFlag will check if the employee information in the EMPLOYEES_SCD2 target table has undergone a change in the source EMPLOYEES table. The NewFlag will check for the occurrence of new employee records in the source EMPLOYEES table.
3. SEQ_GenerateKeys: This sequence generator generates unique keys for the PM_PRIMARYKEY field in the EMPLOYEES_SCD2 table for both new records and records that have undergone change in the fields on which history is maintained in the EMPLOYEES source table, which will be inserted as a new record in the target table.
4. EXP_KeyProcessing_InsertNew & EXP_KeyProcessing_InsertChanged: The expression transformations EXP_KeyProcessing_InsertNew & EXP_KeyProcessing_InsertChanged generate the effective start date PM_BEGIN_DATE for the new records and the changed records that are inserted into the EMPLOYEES_SCD2 target table respectively.
5. FIL_InsertNewRecord, FIL_InsertChangedRecord & FIL_UpdateChangedRecord: The filter transformation FIL_InsertNewRecord passes the new rows if the NewFlag is TRUE while the filter transformations - FIL_InsertChangedRecord & FIL_UpdateChangedRecord passes the changed rows if the ChangedFlag is TRUE.
6. UPD_ForceInserts, UPD_ChangedInserts & UPD_ChangedUpdate: The update strategy transformations UPD_ForceInserts & UPD_ChangedInserts are used to manage inserts for new rows and changed rows respectively while the UPD_ChangedUpdate is used to update the old version rows based on the PM_PRIMARYKEY field.
7. EXP_CalcToDate: This expression transformation generates the effective end date PM_END_DATE for the old version of an employee’s record in the EMPLOYEES_SCD2 target table.
The only optimization needed in the mapping is replacing the three filter transformations with a router transformation.
Create a valid session and workflow for this mapping.
Start the Workflow Manager client tool and click on the Task Developer tab. Go to Tasks > Create to create a new task.

This opens the Create Task window. Select the Session task from the drop-down and enter a name for this task as shown below.

Click Create to continue. Select the mapping created in the previous steps to associate with this session.

Click OK to continue. Click Done in the Create Task window.

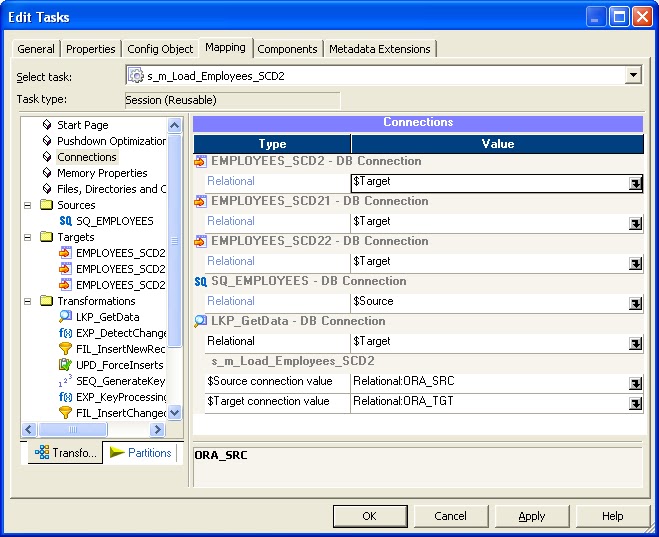
Click OK to continue. Right click on the session task and click Validate to validate the session as shown below.

A notification is generated in the Output Window as shown below stating that the session is valid.
Press Ctrl+S to save the session task.
Click on the Workflow Designer tab. Go to Workflows > Create to create a new workflow.

This opens the Create Workflow window. Provide the workflow name as shown below.
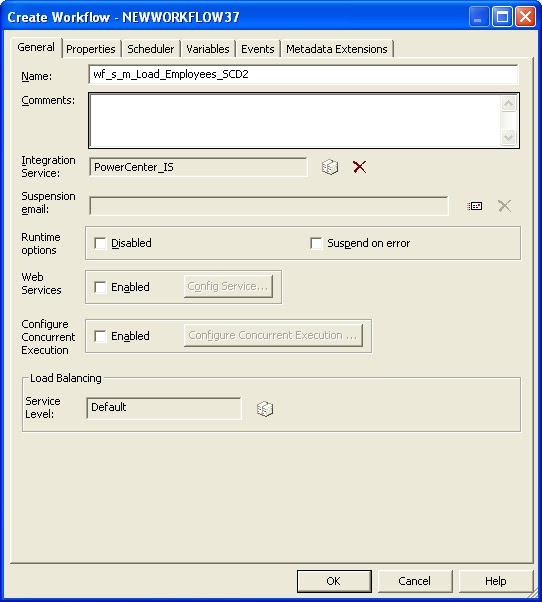
Click OK. Drag the session created in the previous steps from the Repository Navigator into the Workflow Designer workspace. Go to Tasks > Link Task.

Link the Start task to the session task as shown below.

Click Ctrl+S to validate and save the workflow.
Observing the data in the target table, it is evident that since all these records are the current version, the PM_END_DATE for all these records are null.
Assuming that the role of Shane Smith changes to Manager and the department ID of Katie Wells changes to 151 in the source system and a new employee, Jim Mason joins the organization on the 25th March, 2010, the EMPLOYEES table is shown below.
EMPLOYEES
| ||||||
EMP_ID
|
EMP_NAME
|
EMP_ROLE
|
DEPT_ID
|
LOCATION
|
EMPL_STATUS
|
JOIN_DT
|
1321
|
Shaun Mathews
|
Clerk
|
209
|
Atlanta
|
Active
|
13-Apr-08
|
1487
|
Shane Smith
|
Manager
|
110
|
Atlanta
|
Active
|
4-Aug-08
|
1678
|
Katie Wells
|
Manager
|
151
|
Atlanta
|
Active
|
20-Aug-08
|
2050
|
Jim Mason
|
Clerk
|
171
|
Chicago
|
Active
|
25-Mar-10
|
After the workflow runs on the 25th March, 2010, the data loaded in the target table is shown below. Click on the image to see the enlarged view.

The old version of records for Shane Smith and Katie Wells have been updated with a PM_END_DATE of 25-Mar-10 and two new versions of records having PM_PRIMARYKEY values 5 and 6 and a null value for PM_END_DATE get inserted into the target table. The new record for Jim Mason also gets inserted into the target table with a null value for PM_END_DATE, indicating it is the current version of the record in the target table.
Awesome post ! Very useful. Wish everyone can document their work like this.
ReplyDeleteAwesome...
ReplyDeleteThanks guys, will surely post on some more topics soon.
ReplyDeleteHi Nelrick,
ReplyDeleteI feel like applauding for the seamless effort that you have taken here to explain the SCD type 2. I am glad i came across this post. You didnt miss even a minute detail. Hats-off. Keep the good work up. Keep coming with more scenario based post. I would like you to create a post, which will enumerate some scenarios, where you faced difficulties/challenges. All in all, we would like to know various scenarios based posts.
Thanks,
Prashant
It is very help full for beginners...if possible please give some other details such as internal settings of each transformation such as filter condition update strategy and expression etc
ReplyDeleteVery good one...it is too easy to understand...
ReplyDeleteits very nice to see these type of posts..........
ReplyDeleteThanks a lot...........
Very good information and easy to understand, its especially easy for beginners to learn scd concept in informatica.
ReplyDeleteThankyou.
very documentation. The way of explanation very nice. Just I have gone through as per your steps mentioned above. it's working fine. Thanks you very much. Expecting more documents like this..Thanks once again.
ReplyDeleteIt's Really very very useful posts......
ReplyDeleteWhich is helpful to everyone.
Thanks!!!!!!!!!
Excellent !!!!
ReplyDeleteKeep Going with this type of posts which will be useful to everyone...
Excepting more from you !!!
Great Work !!!
Hi, The article is really helpful. Still we can optimize this mapping my removing filters and use router.
ReplyDeleteHow to achieve incremental load in this mapping? Expecting your answer. or please mail the step to achieve incremental load to s.varunzone@gmail.com
Hi Varun,
ReplyDeleteThe mapping will also handle incremental load. The incremental records will comprise the new rows and the updated rows in the source table.
In the example that I have shown, the full load ran on 24th March 2010. The incremental load ran on 25th March 2010. The EMP_ID = 1487 and 1678 undergo updates in the source tables while a new EMP_ID = 2050 is added to the source table. These changes are captured and previous rows for EMP_ID = 1487 and 1678 are discontinued and new current rows for them are inserted into the EMPLOYEES_SCD2 target table, while a new record is inserted for EMP_ID = 2050 into the target table.
Try generating the mapping through the wizard and understand the logic behind each transformation in the mapping.
The filter transformations can be replaced by a single router transformation.
Regards,
Nelrick
HAI NELRICK
ReplyDeleteI WANT TO KNOW SCD2 USIND ROUTER IMPLEMENTAION.
THANKS,
PRASAD.
Very nicely done!
ReplyDelete-- Ben
Excellent,
ReplyDeleteWill you please post a sample with out useing wizard,if you can
Hi Nel,
ReplyDeleteYour post was what i needed,it helped me to start the SCD's in informatica. Now going to the next step, how do i implement version,currentflag with the dates all at the sametime. the wizard allows us to work on the dates or flags or version. how do we use all the 3 at the same time.Can you guide me with an example.
---thank you very much
Jampa
Hi Jampa,
ReplyDeleteIt's a call that the development team takes which approach to use i.e. either version, current flag or start/end date as per the specific requirement. It doesn't make sense to have all these flags/fields together unless we have a very specific requirement as this would unnecessarily complicate the logic, hence, even the mapping templates provided account for only a single versioning method.
For example, we want to load the start/end dates for maintaining customer history so that a company can track a customer's personal information like address, marital status etc so that they can provide him special offers based on his location and marital status, once they find out his address or marital status has undergone a change.
The other example is maintaining history on a product table. Here the requirement is only to create a new version for any attribute that changes for a particular product without bothering about the start/end dates for the old and new versions of the record.
Regards,
Hi Nel,
DeleteIn my scenario we have used RED an ETL tool to have start/end date version and flag all 3 at the same time now as we moved to informatica and we are migrating all the existing processes to informatica we want to have all 3 and the flags are quite important for the supporting Callcentre DWH , is there a chance you can guide me with an example please . BTW im only 1 month old into informatica.
thank you
--Jampa
great one dude.. thankyou verymuch...
ReplyDeleteGreat article man!
ReplyDeleteBut just let me ask you something...
If I'd want to create an exception for a field of the target table on scd 2, where I'll update this field instead of generate a new record in case of change... How can I do that on Informatica?
Hello Nelrick,
ReplyDeleteIt is been a really fantastic work done by you. The explanation is very clear, concise and found very easy to understand for non-informatica people.
best regards,
vidyesh
It is been a really fantastic work done by you. The explanation is very clear, concise and found very easy to understand for non-informatica people.
ReplyDeleteinformatica online training
the mapping wizard applies scd logic and creates a new table at the desitnation. is it possible to use wizard to create scd logic for the table which is already present at the destination. your help will be appreciated.
ReplyDeleteRegards
Rajkumar
Hey Nelrick,
ReplyDeleteIts really good and informative article. I tried this logic without wizard as I was not aware of SCD concepts. I tried this one too and learned SCD part. Thanks.
Regards,
Manasi
I am William..I just browsing through some blogs and came across yours! Excellent blog, good to see someone actually uses for quality posts. Your site kept me on for a few minutes unlike the rest :) Keep up the good work!Thanks for sharing a important information on http://www.blogger.com/comment.g?blogID=34124740&postID=5475356074732326818&page=1&token=1352898695075&isPopup=true
ReplyDeleteReally helpful Thanks a lot!!
ReplyDeleteHow do you handle a case where a record has been deleted in the source table? Currently there is no mapping logic to handle (soft) deletes.
ReplyDeleteThanks,
Derek
ITS REALLY GOOD AND AWESOME EXOLANATION ITS VERY EASY TO LEARN
ReplyDeleteawesome explanation
ReplyDeleteIt was really a nice article and i was really impressed by reading this Informatica Online Course
ReplyDelete