For this illustration, the Customers table in the Sales History (SH) schema in Oracle 10g is used as the source table. Click on each image if needed to open a larger view of the image.
Scenario: When the source and target tables reside in the same database
In this case all the target tables will reside in the SH source schema. The Customers source table will populate multiple target tables - Customers_Finance, Customers_Sales and Customers_Requests.
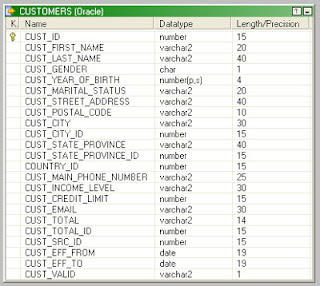
The source table definition is shown below. Similarly there will be three targets having the same table definition.
A mapping that links all the fields from the source table to that of the target tables is shown below. This is the simplest approach that can be used, but the problem lies with scalability i.e. addition of more target tables would mean changes to both the mapping and the session.
Let's look at an approach that will help scalability and also restrict the logic to a single mapping and session.
Create a file Target_Tables_List.txt as shown below that contains all the target tables that need to be loaded by the Customers source table.
The file definition is shown below. Use this file as the source for the mapping.
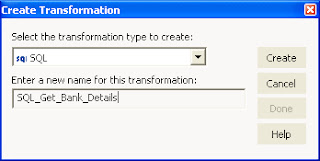
Create a SQL transformation SQL_Insert_Customers_Data after the Source Qualifier. Use the default options as shown below.
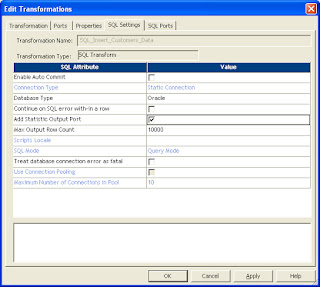
Drag the Table_Name port from the Source Qualifier transformation to the SQL transformation. Edit the SQL transformation. Check the Add Statistic Output Port check box as shown below in the SQL Settings tab. The Add Statistic Output Port attribute creates adds a NumRowsAffected output port that returns the total number of rows affected by INSERT, DELETE, UPDATE query statements for each input row.
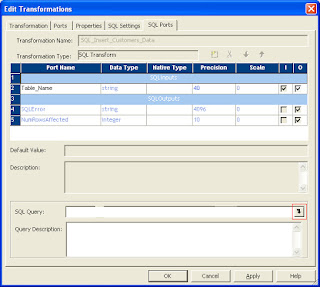
Click on SQL Ports tab. Click on the section highlighted below to add the SQL Query to insert data into the target tables.
Click on the Table_Name port under String Substitution to substitute the table name in the query as shown below.
Complete the query by adding all the column names of the table in the query as shown below.
The above query could have been added as INSERT INTO ~Table_Name~ SELECT * FROM CUSTOMERS. But for this, the column order should be the same for all the tables in the database. To play safe, mention all the column names in the INSERT and SELECT part in the same order as is the syntax.
Create a SQL_Audit table to maintain a log of all the tables loaded for every run. This table can be customized further based on additional requirements. The SQL_Audit table definition is shown below.
Create an expression transformation EXP_Audit to generate the load date timestamp and also customize the error message if no SQL errors are encountered. The expression transformation ports are shown below.
The expression in the SQLError_out port is : IIF(ISNULL(SQLError_in), 'No errors occured', SQLError_in).
Connect the output ports from the SQL transformation to the SQL_Audit table. The complete mapping is shown below.
After running the session for the first time, the data loaded in the SQL_Audit table is shown below. Also, as seen from the table, all the three target tables are loaded correctly with 55500 rows from the source Customers table.
The target tables have a primary key defined on CUST_ID. So, if we rerun the job, the load should fail for all the three tables due to unique constraint violated. The session would succeed because the target table SQL_Audit is loaded correctly with 3 rows, but on checking the SQL_Audit table, it is evident that no data is loaded into the 3 target tables and the reason will be in the SQL_Error column of the SQL_Audit table as shown below.
The complete SQL Error loaded in the SQL_Error column for the CUSTOMERS_FINANCE target table is shown below.
ORA-00001: unique constraint (SH.CUSTOMERS_FINANCE_PK) violated Database driver error... Function Name : executeDirect SQL Stmt : INSERT INTO CUSTOMERS_FINANCE (CUST_ID, CUST_FIRST_NAME, CUST_LAST_NAME, CUST_GENDER, CUST_YEAR_OF_BIRTH, CUST_MARITAL_STATUS, CUST_STREET_ADDRESS, CUST_POSTAL_CODE, CUST_CITY, CUST_CITY_ID, CUST_STATE_PROVINCE, CUST_STATE_PROVINCE_ID, COUNTRY_ID, CUST_MAIN_PHONE_NUMBER, CUST_INCOME_LEVEL, CUST_CREDIT_LIMIT, CUST_EMAIL, CUST_TOTAL, CUST_TOTAL_ID, CUST_SRC_ID, CUST_EFF_FROM, CUST_EFF_TO, CUST_VALID) SELECT CUST_ID, CUST_FIRST_NAME, CUST_LAST_NAME, CUST_GENDER, CUST_YEAR_OF_BIRTH, CUST_MARITAL_STATUS, CUST_STREET_ADDRESS, CUST_POSTAL_CODE, CUST_CITY, CUST_CITY_ID, CUST_STATE_PROVINCE, CUST_STATE_PROVINCE_ID, COUNTRY_ID, CUST_MAIN_PHONE_NUMBER, CUST_INCOME_LEVEL, CUST_CREDIT_LIMIT, CUST_EMAIL, CUST_TOTAL, CUST_TOTAL_ID, CUST_SRC_ID, CUST_EFF_FROM, CUST_EFF_TO, CUST_VALID FROM CUSTOMERS Database driver error... Function Name : ExecuteDirect
Any new target tables that have to be added can be mentioned in the Target_Tables_List.txt flat file without making any changes to the mapping or session.
